We have this great fireplace that the previous owners mounted their TV above. We decided that we’d hang ours there too, especially since there were a few sets of holes from different brackets and our TV would just hide it all.
We mounted the 55” TV and placed a sound bar below it but...the outlets! There was one on each wall on the sides not even the same wall!
 |
| Outlets on each side wall. |
I decided the easiest thing would be to tap into the wall switch for the fireplace outlet I didn’t want to connect to the outlet because it is switched for the fireplace fan. Connecting directly to the switch allowed for uninterrupted power and no inadvertent flip of the switch and loss of power.
I used a circular saw set to the depth of the drywall so I could cut out an access hole it’s easier to cut one long piece than small holes because you can screw the piece right back onto the studs to close it back up.
I ran my Romex cable with some fish tape from the outlet to the hole from there, I had to drill out access holes in the studs.
We stream everything on our TV so we don't need any coax cable. I contemplated adding some sort of access for an HDMI cable from near the floor to up near the outlet to plug in a Blu-Ray Player or a game console. I knew I needed at least 2 outlets for the TV and the sound bar and knowing I’d need more, I decided to add a double gang box with a total of 4 outlets.
After wiring everything up and testing, I patched up the hole, threw on the drywall mud, and then painted the room. I put the ‘ol 55 incher back up and was so impressed with my work.
 |
| Mudding and prepping for paint. |
 |
| Completed project, version 1 |
That was the end of version #1. Then Stacey considered moving the TV to the wall on the left side. Fortunately I won that battle and I didn’t have to repeat the entire process on another wall. She did win the battle to upgrade to a 75” TV though. I mean it wasn’t much of a battle, I did ask her if she thought it would be too big. It didn’t take much for me to let her win that one!
We waited for a Black Friday sale at Costco and bought the bigger LG TV. It’s smart so all we had to do was plug it in. The mount we used for the 55” TV worked on the new one so it was an easy conversion...except it was HEAVY! It took both of us to heft the 80 pound TV up onto the wall. I also needed to purchase an Optical Cable for the sound bar but it needed a 90 degree angle on the TV side. I found this Monster Cable and it works beautifully. All the outlets were utilized when we plugged in the TV, the sound bar, some LED backlighting and the Xbox.
Yes...I added the Xbox to this TV. I mean who wants to play on an old 48” TV when you can play on a 75”?!
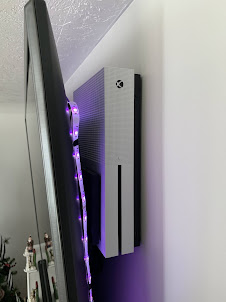
I had a second reason to do this actually. We had no place to put the Blu-Ray player and didn’t want cables running from the floor to the TV. Hooking up the Xbox solved this and the way I mounted it was even better! I know that an Xbox can stand on its end, and figured it would fit behind the TV. It did but I had to mount it up high to clear the tilt of the TV. Now how to keep it up there without falling?
I found a few different types of brackets and shelves but I used a tried and true technique I used a few other places in the house. I had used a 3M Command Strip with heavy duty hooks on each strip. They function like Velcro but are much stronger. These are rated to hold 16 pounds and my Xbox is no more than 7 pounds. I was able to mount it behind the TV and used another strip to connect my external hard drive to the Xbox too.
 |
| Xbox mounted behind the TV. Note the led lighting. |
 |
| Look Ma? No wires! |
 |
| The Christmas Tree washed out the LED lighting on the left side. There are longer kits available that I may upgrade to sometime. |


Comments
Post a Comment